
Egyptian Fino bread is one of Egypt’s most beloved bakery staples. You’ll spot these soft, elongated rolls everywhere—from family kitchens to bustling street bakeries.
They look a bit like hot dog buns but feel lighter, with a delicate crumb that just melts in your mouth. Across the Middle East, folks call them different names—Samoli in Saudi Arabia, Samoon in the UAE—but the bread itself is a daily must-have for sandwiches, dipping, or just eating plain.
You only need simple pantry staples like flour, milk, yeast, and butter to make authentic Egyptian Fino bread at home. The process is refreshingly simple—minimal kneading, easy shaping, nothing fancy or intimidating.
Even if you’re new to baking, you can pull this off with basic kitchen tools. No need for complicated methods or equipment; Fino bread lets home bakers get bakery-worthy results right in their own oven.
Homemade Fino bread isn’t just easy—it freezes beautifully and you can tweak it however you like. Maybe sprinkle on sesame seeds, brush the tops with egg wash for a glossy finish, or toss in some thyme if you’re feeling bold.
Key Takeaways
- You can make Egyptian Fino bread with basic ingredients and straightforward steps.
- The whole process takes about two hours, including rising, and you’ll end up with six soft, versatile rolls.
- These rolls freeze for up to three months and are easy to customize with toppings like sesame seeds or herbs.
What Is Egyptian Fino Bread?
Egyptian fino bread is a soft, baguette-shaped roll that ranks just behind the classic flatbread eish baladi in popularity. It’s wheat-based, light, and long—perfect for sandwiches, snacks, or just tearing off a piece at mealtime.
The Origin and History of Fino Bread
Fino bread has its roots in European baking. The name comes from the Italian “fino,” which means fine or refined.
Egyptian bakeries split into two camps over time. You’ve got traditional “baladi” bakeries with their flatbreads, and “afrangi” bakeries that focus on Western-style breads.
Afrangi bakeries brought Fino bread into the spotlight. They offered a softer, lighter alternative to the dense flatbreads everyone knew.
Urban Egyptians loved the convenience—suddenly, sandwiches got a lot easier. These days, Fino bread is a mash-up of European technique and Egyptian taste.
Key Features and Characteristics
Fino rolls are about 20 centimeters long, slim, and easy to split for sandwiches.
What sets them apart:
- Soft, airy crumb
- Long, baguette-like shape
- Wheat flour base
- Thin crust that doesn’t get in the way
You can stuff them with cheese, halawa, or even fried cow liver—whatever’s handy. Bakers shape each roll before baking, so the bread stays soft but sturdy enough to hold fillings.
Cultural Importance in Egypt
Egyptian fino bread holds cultural value as the country’s second most eaten bread. Families rely on it for daily meals and quick snacks.
Kids often take fino bread sandwiches to school. Adults grab it for breakfast or a light dinner.
Some people just dip it in warm milk—no frills, just good bread. That says a lot about how satisfying it is on its own.
You’ll find street vendors and small shops selling Fino bread all over Egyptian cities. It’s affordable, versatile, and basically woven into everyday life.
Essential Ingredients for Authentic Fino Rolls
You only need a handful of key ingredients to get that signature soft, light texture. Flour gives the bread structure, milk adds richness, and butter makes the crumb extra tender.
Choosing the Right Type of Flour
All-purpose flour is your best bet for fino rolls. Its protein content—usually 10-12%—lets the bread rise nicely without turning dense.
Bread flour has too much protein and turns the bread chewy. Cake flour falls apart.
Fresh flour matters. Old flour can mess with your rise. Keep it cool and dry.
Sift the flour to get rid of lumps and add a bit of air. Most recipes use about 2 cups plus 3 tablespoons.
Role of Milk and Liquid Ingredients
Milk is key for softness and flavor. It brings fat and protein to the table, making the crumb tender.
Warm milk works better than cold—just a bit warmer than your finger, not hot. That helps the yeast get going.
You’ll need about 1/2 cup of warm milk. Some folks add a splash of warm water too, usually about 1/4 cup.
Whole milk gives the best results. Low-fat milk makes the rolls a bit less tender.
Keep liquids around 100-110°F. Too hot and you’ll kill the yeast. Too cold and the dough rises at a snail’s pace.
Sweeteners: Sugar and Alternatives
Sugar does more than sweeten things up. It feeds the yeast and helps the bread brown.
Plain white sugar works fine. One tablespoon is enough to get things moving.
Dissolve the sugar in your warm liquid, then add the yeast. That way, the yeast gets a good meal and the dough rises properly.
You can swap in honey for sugar if you want. Brown sugar works too, but expect the color to change a bit.
Skip artificial sweeteners—they don’t feed the yeast, so your bread won’t rise like it should.
Butter and Fats in Fino Bread
Butter adds richness and keeps the bread fresh longer. Most recipes use a tablespoon of chilled butter, sometimes with a couple tablespoons of oil.
Butter plus oil is the magic combo. Butter brings flavor, oil keeps things soft.
Room temp butter is easier to mix in, but cold butter gives a better crumb. Cut it up before adding.
You can use vegetable or olive oil. Margarine just doesn’t have the same flavor—stick with real butter if you can.
Step-by-Step Guide: How to Make Egyptian Fino Bread at Home
Making Egyptian Fino bread means activating yeast, kneading dough with milk and butter, and letting things rise for that signature soft texture.
Preparing and Activating Yeast
Start by mixing warm milk, warm water, sugar, and yeast in a bowl. The milk should feel warm, not hot—too much heat kills yeast.
Temperature matters. Aim for just above room temp. If the liquid’s too hot, the yeast won’t make it.
Mix the ingredients, then let the bowl sit for about 10 minutes. You want to see foam and bubbles—that means the yeast is alive and kicking.
No foam after 10 minutes? The yeast might be old, or your liquid was too hot. It’s best to start over with fresh yeast.
Mixing and Kneading the Dough
Once your yeast is ready, add the rest of the ingredients except butter—so, all-purpose flour, salt, and oil. Flour gives structure, salt boosts the flavor.
Knead for about 10 minutes by hand or with a mixer. It’ll start sticky but smooth out as you go.
Now add the butter. Work in chilled butter and knead for another 5 minutes. That’s where the soft, tender crumb comes from.
The dough should feel soft, a bit sticky, but smooth. If you stretch it, it shouldn’t tear right away.
First Rise and Dough Resting
Cover the dough with a damp towel or plastic wrap and set it in a warm spot. Let it rise for 1.5 to 2 hours, or until it’s doubled.
Rising time depends on your kitchen. If it’s chilly, it takes longer. If it’s warm, things move faster.
The yeast will make bubbles, giving you that light, fluffy texture. Once it’s doubled, you’re ready to shape the rolls.
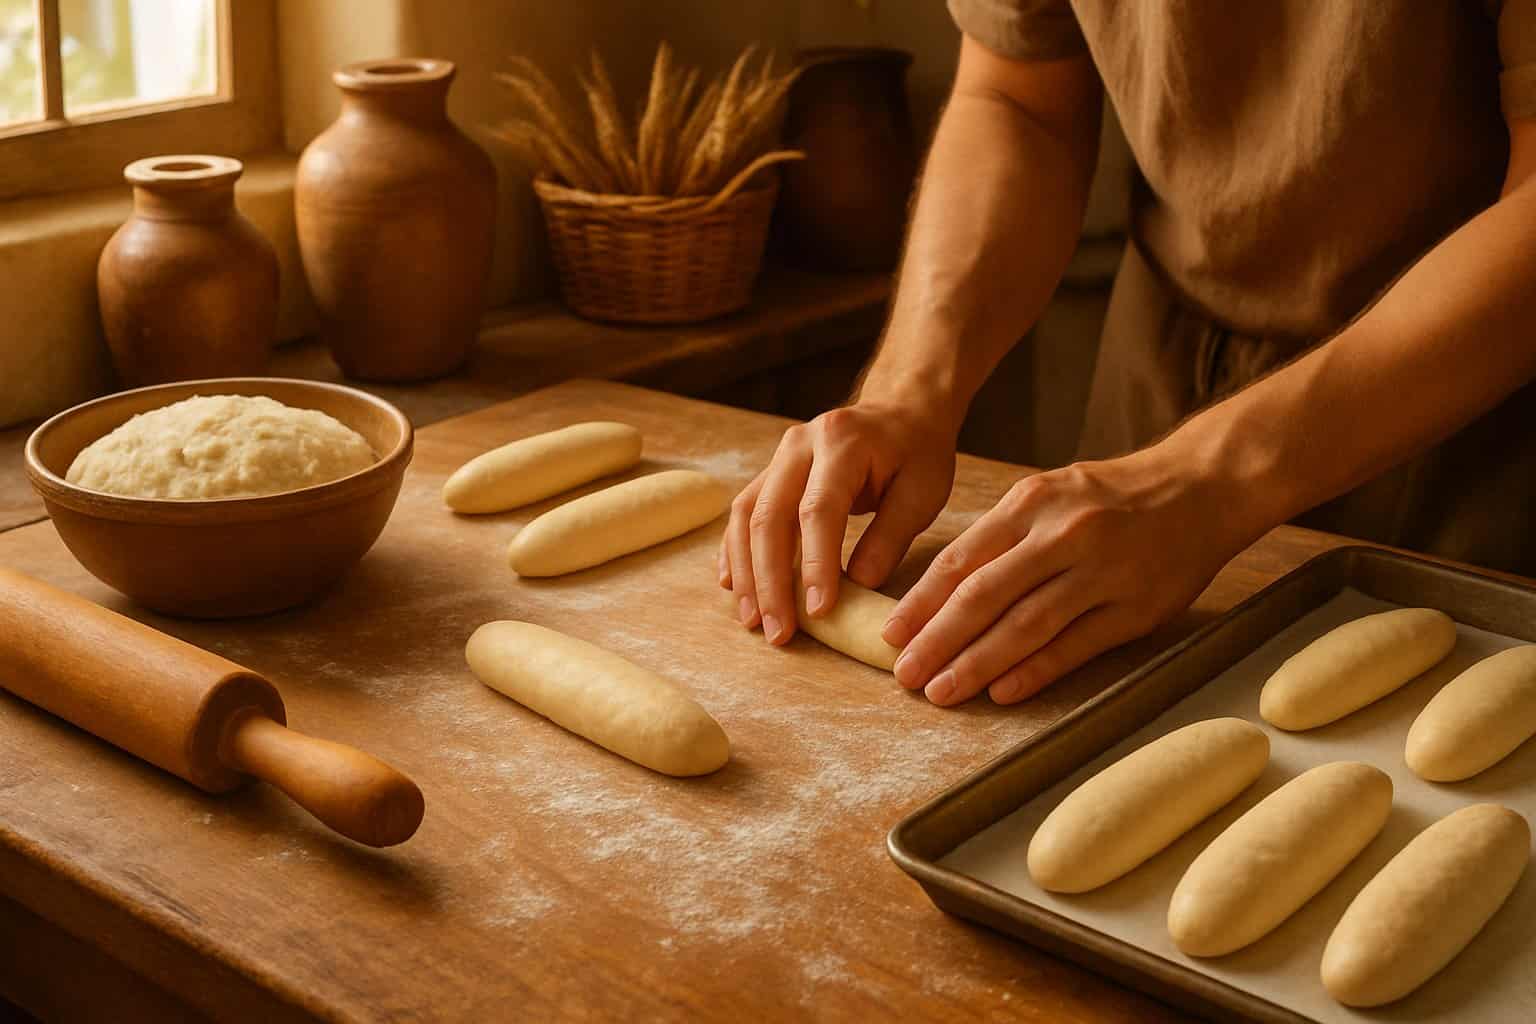
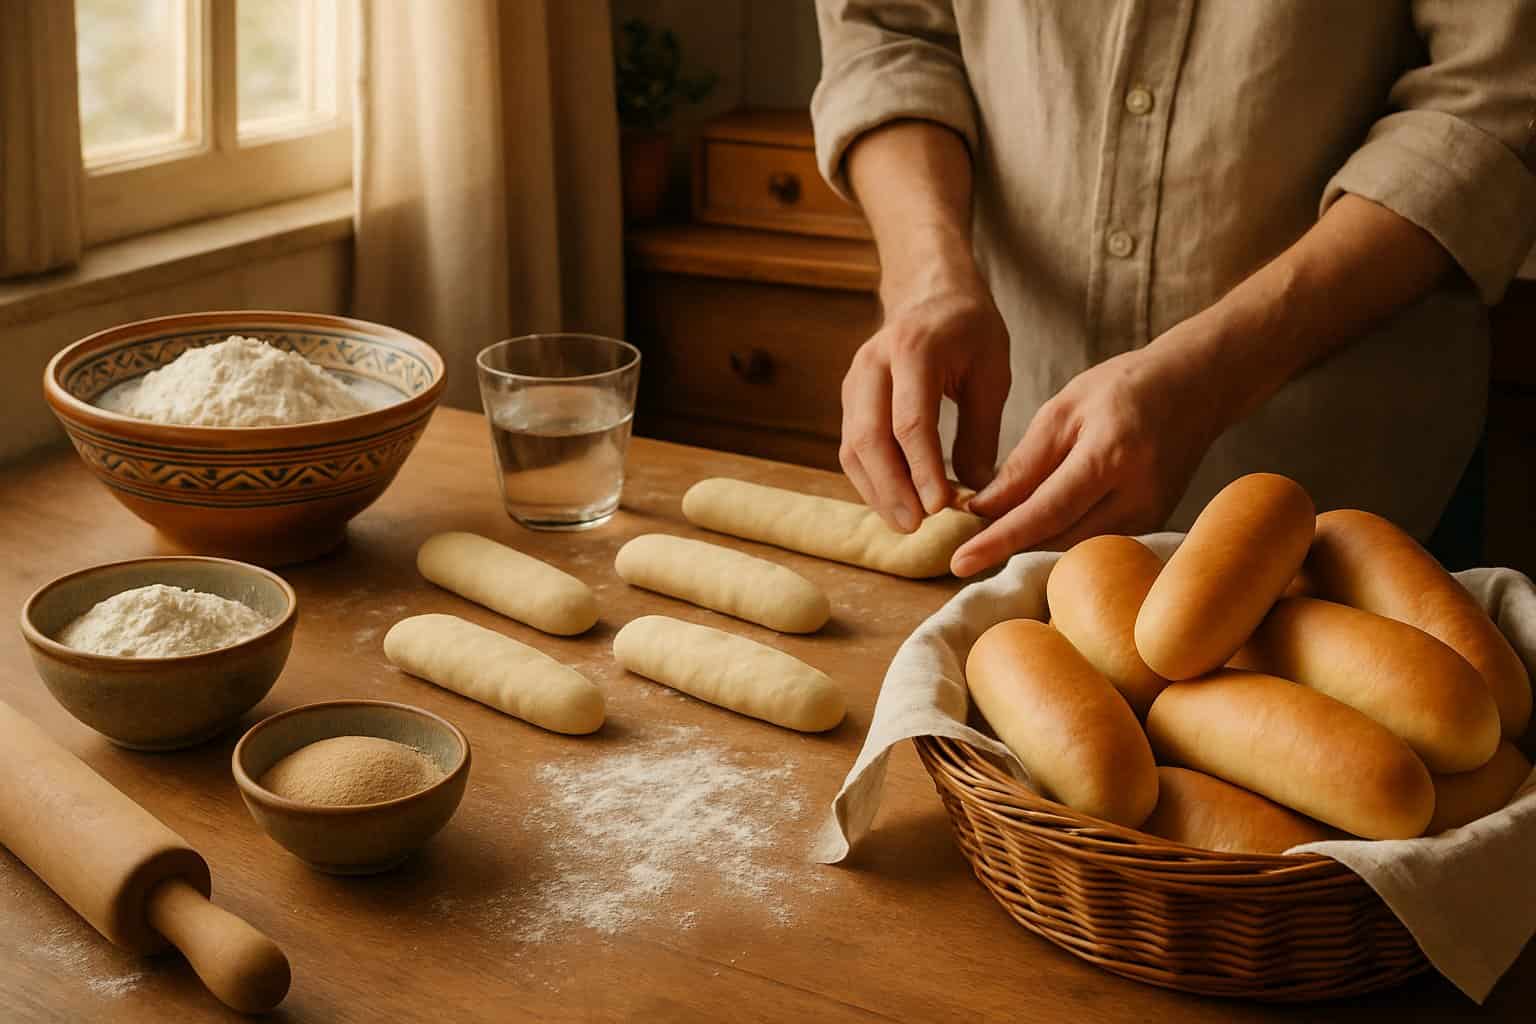
Shaping and Baking Your Fino Bread Rolls
After the dough rises, shaping gives you those classic long rolls, and the second proof brings out the airy softness. Baking at the right temp locks in that golden color and pillowy inside.
Portioning and Shaping Rolls
Cut the dough into six equal pieces. A kitchen scale helps, but you can eyeball it—shoot for about 85-90 grams each.
Shape each piece into a ball by tucking the edges under. Let them rest for five minutes so the gluten chills out.
To shape:
- Roll each ball into an oval about 6 inches wide and 9 inches long.
- You probably won’t need extra flour on the counter.
- Try to keep the thickness even.
Roll the oval up tightly from one long edge. Pinch the seam and lay it seam-side down on a parchment-lined baking sheet.
Leave about two inches between rolls. They should look like mini sub rolls by now.
Second Proof and Final Rise
Cover the rolls with a clean towel or plastic wrap to keep them from drying out.
Let them rise for 60-90 minutes at room temp. Warmer kitchens go faster, colder ones might take up to two hours.
How to tell they’re ready:
- Rolls should be about 50% bigger.
- Poke one gently—if the dent comes back slowly, you’re good.
- They should look a little puffy.
This second rise is what makes the rolls so light and airy.
Baking Techniques for Softness
Crank your oven up to 400°F (200°C) while the rolls finish proofing. Put the rack in the middle.
Brush the tops with milk for color and that trademark soft crust.
Baking:
- Bake for 8-10 minutes, until golden.
- The inside should hit 190°F (88°C).
- Tap the tops—they should sound a bit hollow.
As soon as they’re out, brush them with melted butter for extra softness. It adds flavor and keeps the crust tender.
Cool on a rack for 10 minutes. Once they’re cool, stash them in a sealed bag so they stay soft.
Tips for Achieving Perfect Softness and Texture
Getting that perfect Fino texture is all about handling your ingredients right and storing the rolls properly. Pay attention to how you use milk and butter, and keep finished rolls sealed up if you want them to stay soft.
Secrets to a Tender Crumb
Milk really makes a difference in Egyptian fino bread. Warm milk wakes up the yeast way better than cold milk does.
The proteins in milk make the bread tender and give it that soft texture you want.
Add your butter at the right moment. Mix everything else and knead for about 10 minutes first.
Then, toss in chilled butter and knead another 5 minutes. This step helps the dough come together just right.
Key techniques for soft texture:
- Use all-purpose flour, not bread flour
- Keep your water warm, not hot
- Let the dough rise fully—about 1.5 to 2 hours for the first rise
- Don’t skip the second rise (1 hour)
The second rise matters more than you might think. It gives the bread a better oven spring and makes each roll’s crumb extra soft.
How to Keep Your Rolls Fresh
Once the bread cools, stash Egyptian fino rolls in a sealed plastic bag. This keeps them soft at room temperature for a few days.
Want to keep them longer? Freeze the rolls in freezer bags—they’ll be good for up to 3 months.
To use frozen rolls, let them thaw on the counter. If you’re in a hurry, microwave them for a few seconds.
Storage tips:
- Let rolls cool all the way before storing
- Use airtight bags or containers
- Keep at room temp for 2-3 days
- Freeze for longer storage
Skip the fridge. It makes the bread go stale faster and the texture gets weird.
Serving Suggestions and Traditional Uses
Egyptian fino bread is perfect for sandwiches or light meals. It also goes well with traditional dips and drinks that bring out its mild flavor.
Popular Egyptian Sandwich Ideas
Fino bread is the backbone of so many Egyptian sandwiches. Its soft texture holds up to fillings without falling apart.
Falafel sandwiches are everywhere. You get crispy falafel, tahini sauce, pickles, and herbs all tucked in. The bread balances the rich filling.
Ful medames is a classic too. This fava bean dish, plus hard-boiled eggs, tomatoes, and onions, makes a hearty breakfast or lunch.
Cheese and veggies work if you want something lighter. White cheese, cucumbers, tomatoes, and mint—super refreshing. Sometimes people add jam or honey for a sweet twist.
Meat fillings like grilled chicken, lamb, or beef are great with this bread. Throw in pickles, lettuce, and garlic sauce for a filling sandwich.
Pairings and Dipping Options
Try dipping the bread in warm milk—it’s a comforting Egyptian breakfast or snack. Simple, but it just works.
Tea and coffee are classic with fino bread. Lots of families serve these rolls with hot drinks in the morning or during afternoon breaks.
Honey and jam are sweet toppings that bring out the bread’s flavor. Local honey or fig jam are especially nice.
Yogurt-based dips make a savory pairing. Labneh with olive oil and za’atar is a favorite.
Soup accompaniment is another common use. The bread soaks up broth and stew but doesn’t fall apart like some other breads.
Troubleshooting Common Issues When Baking Fino Bread
Getting fino bread just right means paying attention to dough development and crust. Most problems come from yeast that doesn’t activate or from baking at the wrong temperature.
Dough Not Rising Properly
If your dough isn’t rising, that’s usually the biggest headache. Maybe the yeast is old, or the kitchen’s too cold.
Check your yeast first. Mix it with warm water (105°F–115°F) and a pinch of sugar. Wait 10 minutes—no bubbles means your yeast is dead.
Cold kitchens slow everything down. You want a warm spot (75°F–85°F) for the dough to double.
Too much flour can also mess things up. The dough should feel a little sticky but not unmanageable. Add flour just a tablespoon at a time if it’s too wet.
Rich doughs with milk and sugar take longer to rise. That’s just how it is.
Give the first rise extra time. Cover the bowl with a damp towel so the dough stays warm and doesn’t dry out.
Crust Too Hard or Too Soft
Crust issues usually come from oven temperature or not enough steam.
Hard crust means the oven’s too hot or the bread baked too long. Use an oven thermometer—fino bread likes 375°F to 400°F.
Add steam for the first 15 minutes. Just put a pan of hot water on the bottom oven rack. This keeps the crust soft while the bread rises.
Soft, pale crust means your oven’s too cool. The bread might look done but won’t brown right.
Brush the tops with milk before baking. You’ll get that golden color.
After 15 minutes, take out the water pan so the crust can finish up. The bread is done when it sounds hollow underneath.
Frequently Asked Questions
Making Egyptian Fino bread at home takes a few specific tricks for that soft, light crumb. The main differences from other Egyptian breads are in the ingredients, kneading, and the double rise.
How can I create authentic Egyptian Fino bread at home?
You’ll need all-purpose flour, warm milk, yeast, sugar, salt, oil, and butter. Mix warm milk, sugar, water, and yeast in a bowl and let it sit for about 10 minutes.
Knead the dough for 10 minutes, then add chilled butter. Knead another 5 minutes until the dough is smooth and a little sticky.
You need two rises. The first takes 1.5 to 2 hours. After shaping into six balls, let them rise again for an hour before baking.
What is the key to achieving the softness in traditional Egyptian bread rolls?
Warm milk is the secret—its proteins and fats make the bread soft and keep it fresh longer.
The double rise is critical. The first builds flavor, the second gives that pillowy texture.
Kneading matters too. The pull-and-bang method helps develop gluten without making the dough tough.
Can you provide a step-by-step guide for making Fino bread?
Start with warm milk, sugar, water, and yeast in a bowl. Let it proof for 10 minutes until foamy.
Add flour, salt, and oil. Knead for 10 minutes until the dough is less sticky.
Mix in chilled butter and knead 5 more minutes. The dough should be smooth but still a bit sticky.
Cover and let rise 1.5 to 2 hours. Divide into six pieces and shape into balls.
Roll each ball into a 6-by-9-inch rectangle, then roll up into a log. Place on a baking sheet.
Cover and let rise another hour. Bake at 400°F for 10 minutes, or until golden.
What are the differences between Fino bread and Aish Baladi?
Fino bread comes from the “afrangi” (Western-style) bakery tradition. Aish Baladi is the classic Egyptian flatbread from “baladi” bakeries.
Fino is soft, light, and fluffy. Aish Baladi is denser and chewier.
Fino uses milk and butter for richness. Aish Baladi sticks to simpler, dairy-free ingredients.
Shapes are different too—fino is long and roll-shaped, a bit like a hot dog bun. Aish Baladi is round and flat.
Which ingredients are essential for baking traditional Egyptian Fino bread?
All-purpose flour is the base. It gives a lighter texture than bread flour.
Warm milk is a must for that soft crumb. Make sure it’s warm, not hot.
Use fresh active yeast—instant or regular both work.
Sugar feeds the yeast and adds a hint of sweetness. Salt brings out the flavor and keeps yeast in check.
Oil and butter give the bread its texture and taste. Add the butter chilled, not melted.
How does the baking process for Fino bread differ from that of other Egyptian bread types?
Fino bread bakes at a higher oven temperature—about 400°F. That’s hotter than what you’d use for some of the classic Egyptian breads.
It only needs about 10 minutes in the oven. Quick, right?
The double-rising process really sets Fino apart. Most traditional Egyptian breads just get one rise, or sometimes they skip it altogether.
Shaping is another story. Unlike Aish Baladi, which you flatten into rounds, Fino dough needs to be rolled and shaped into logs.
The dough itself is richer, thanks to milk and butter. Those ingredients help the bread brown up nicely and give it a much softer crust than what you’d expect from most Egyptian breads.
Related posts:
 Egyptian Baladi Bread (Eish Baladi): Make Your Own Traditional Flatbread
 Authentic Basbousa Recipe (Egyptian Semolina Cake) with Sweet Syrup Tips: A Complete Guide
 Syrian Baba Ganoush
 Alexandrian-Style Ful Medames: How to Make Spicy Foul Iskandarani
 Egyptian Green Beans (Fasoolya Khadra) with Tomato Sauce


