In Egypt, bread isn’t just food—it’s life. The Arabic word “aish” means both bread and life, which says a lot about how central this flatbread is to Egyptian culture.
For thousands of years, families have baked this whole wheat bread with nothing fancy—just flour, water, yeast, and salt.
Egyptian Baladi Bread lets home bakers create real-deal flatbread with a soft, chewy inside and a slightly crisp outside. It’s perfect for scooping up stews, dips, and whatever else you can dream up.
Unlike regular pita, this traditional recipe leans on whole wheat flour and bakes at super high heat. That’s how you get the signature puff and texture Egyptians have loved forever.
Making this bread at home connects you to a recipe that goes back to the pharaohs. With basic ingredients and a little patience, you can bake nutritious flatbread for wraps, sandwiches, or just to mop up your favorite Middle Eastern meals.
The process isn’t complicated, but you’ve got to pay attention to the details if you want the best results.
Key Takeaways
- Egyptian Baladi Bread is a traditional whole wheat flatbread that means “life” in Arabic and has been made for thousands of years.
- The bread calls for just four basic ingredients, but you need high heat to get that soft interior and crispy exterior.
- This versatile flatbread is perfect for scooping dips, wrapping meats, or serving with classic Egyptian dishes.
What Is Egyptian Baladi Bread (Eish Baladi)?
Egyptian baladi bread is the country’s most popular bread and a total staple of Egyptian cuisine. This whole wheat pita-style bread stands out with its distinct pocket structure and nutty flavor.
Defining Aish Baladi
Aish baladi is Egypt’s national bread. It’s mostly wheat flour, with a good chunk of whole wheat or bran mixed in.
The word “aish” comes from the Arabic root for “to live,” so it means “life” or “livelihood.” The term “baladi” means “of the country” or “local,” which really underlines how tied this bread is to Egyptian identity.
This bread uses simple ingredients—wheat flour, water, salt, and yeast. The dough ferments, often with a pre-ferment method for extra flavor.
Ancient Egyptians nailed down the basics of this bread thousands of years ago. These days, most people use commercial yeast instead of wild fermentation.
Key Characteristics of Egyptian Flatbread
Egyptian flatbread has a few things that set it apart. When you bake it at high heat on hot stone, it forms a big pocket.
Physical Properties:
- Round and flat, usually 6-8 inches wide
- Brownish, bran-rich crust
- Soft, chewy inside
- Large pocket inside for stuffing
The flavor is mild and nutty thanks to all that whole wheat. It’s super versatile—great with sweet or savory foods.
Aish baladi actually stays fresh for a few days if you store it right. The big pocket makes it ideal for sandwiches, and you can tear it up to scoop dips or stews.
There’s a good amount of fiber in there, too, thanks to the whole wheat.
Comparison to Other Flatbreads
Egyptian bread isn’t quite like other Middle Eastern flatbreads. Sure, it looks like pita, but aish baladi uses more whole wheat and comes out denser.
Key Differences:
| Feature | Aish Baladi | Regular Pita | Naan |
|---|---|---|---|
| Wheat content | High whole wheat | Mostly white flour | White flour |
| Thickness | Medium-thick | Thin | Thick |
| Large single pocket | Small pocket | No pocket | |
| Texture | Chewy, dense | Light, airy | Soft, pillowy |
Lebanese and Syrian pitas usually use white flour and have a lighter texture. Turkish pide is thicker and sometimes topped before baking.
Aish baladi’s whole wheat content and the traditional stone oven method really make it unique. That high baking temp creates steam fast, which forms the big pocket.
Indian naan and Afghan bread are a different story—they use dairy or eggs, but Egyptian flatbread keeps things simple. No dairy, no eggs, just the basics.
Historical and Cultural Significance
Eish baladi has shaped Egyptian society for thousands of years. It’s more than food—it’s a cultural symbol.
Origins in Ancient Egypt
Ancient Egyptians started baking flatbread over 5,000 years ago. You can actually see it in tomb paintings—people kneading dough, baking together.
The Nile Delta gave them great wheat. Ancient bakers came up with techniques that haven’t changed much since.
Back then, they:
- Kneaded dough by hand
- Used communal ovens
- Relied on natural fermentation
- Stuck with whole wheat flour
Bread was sacred. People offered it to gods and the dead.
Workers building the pyramids ate this bread daily. Archaeologists found massive bakeries near the old construction sites—those guys needed to eat!
Role in Egyptian Daily Life
Egyptians eat aish baladi at nearly every meal. Breakfast, lunch, dinner—it’s always there.
In rural areas, some families still bake bread the old-fashioned way. Women gather at communal ovens and bake together.
Bread isn’t just food—it’s a utensil. People scoop up ful medames and ta’ameya with it.
People use it for:
- Wrapping grilled meats
- Dipping in stews and sauces
- Stuffing with veggies
- Sharing with guests
Village economies often depend on bread. Local bakers keep their communities fed with fresh loaves.
The government subsidizes bread to keep it cheap. That shows just how essential it is.
Symbolism and Traditions
“Aish” means both bread and life. That’s how seriously Egyptians take bread.
“Baladi” translates to “of the country” or “traditional.” The name really highlights its authentic, local roots.
Bread protests in the 1970s? People took to the streets when the government cut subsidies. That’s real passion for bread.
Egyptian hospitality is all about sharing bread. Hosts always offer fresh bread to guests.
Baking techniques get passed down through families. Mothers show daughters how to knead and shape the dough.
Every loaf connects Egyptians to their ancestors. There’s something pretty special about that.
Essential Ingredients for Authentic Aish Baladi
To make real aish baladi, you need the right ingredients. The combination of flours, yeast, and a few extras gives the bread its earthy flavor and rustic texture.
Whole Wheat Flour and White Flour
Authentic aish baladi uses a mix of whole wheat flour and white flour. The whole wheat brings that nutty taste and brown color.
Traditional recipes use more whole wheat than regular pita—usually about 60% whole wheat, 40% white flour.
Tips for flour:
- Go for unbleached, organic whole wheat if you can
- Use bread or all-purpose flour for the white part
- Skip bleached flours—they mess with the flavor
- Keep whole wheat flour in the fridge so it doesn’t go rancid
Whole wheat gives fiber and that classic taste. White flour helps the bread puff up and form a pocket.
Choosing the Right Yeast
Active dry yeast works best here. It gives reliable rise and allows for a slow ferment, which means better flavor.
Some people use a starter like biga or poolish. You ferment a bit of flour, water, and yeast for a day in the fridge.
Yeast tips:
- ¾ teaspoon active dry yeast for the starter
- Test yeast in warm water first
- Water should be 100-110°F to wake up the yeast
- Instant yeast isn’t ideal for traditional recipes
Slow fermentation gives the bread more flavor and makes it easier to digest. If you’ve got fresh yeast, that works too.
Other Key Ingredients
A few more things round out the recipe. Salt brings out the flavor and helps the dough hold together.
Honey or sugar feeds the yeast and takes the edge off the whole wheat’s bitterness. Honey tastes more traditional.
Other essentials:
- Bran flakes: finely ground for dusting and that authentic look
- Salt: about 1 tablespoon per batch
- Honey: 3 tablespoons for the yeast and a touch of sweetness
- Water: filtered, at the right temp
Bran gives the bread its classic speckled look and helps keep it from sticking while you shape it. Plus, it adds a bit of nutrition.
How to Make Egyptian Baladi Bread at Home
Making authentic aish baladi means mixing whole wheat and white flours with yeast, letting it rise, and using stovetop cooking instead of a traditional oven. The real trick is patience during fermentation and nailing the two-step cooking method with a hot pan and grill.
Preparing the Dough
Start with the right blend: 1½ cups white flour and 1½ cups whole wheat flour. If you like lighter bread, just use a bit more white flour.
You’ll need:
- 1 tablespoon dry yeast
- 1 teaspoon salt
- ¼ teaspoon sugar
- 1 tablespoon honey
- ½ to 1 cup warm water
Sprinkle yeast and sugar over ½ cup warm water. Wait for it to bubble.
In another bowl, sift and mix the flours and salt. Pour in the yeast mixture and start mixing—use a mixer if you want.
Add warm water bit by bit as you mix. Toss in the honey.
The dough should be soft but not sticky. If it sticks, add a little more wheat flour and knead longer.
Fermentation and Rising Process
Rising makes or breaks aish baladi. Brush a bowl with corn oil and plop the dough in.
Cover it with plastic wrap. Let it sit somewhere warm and dark for an hour.
After the first rise, divide the dough into five pieces. Cover them again with plastic wrap.
Wait another hour for the second rise.
Don’t rush this—patience is everything. If you rush, the bread won’t puff. The yeast needs time to do its thing.
Too hot? You’ll kill the yeast. Too cold? It’ll take forever.
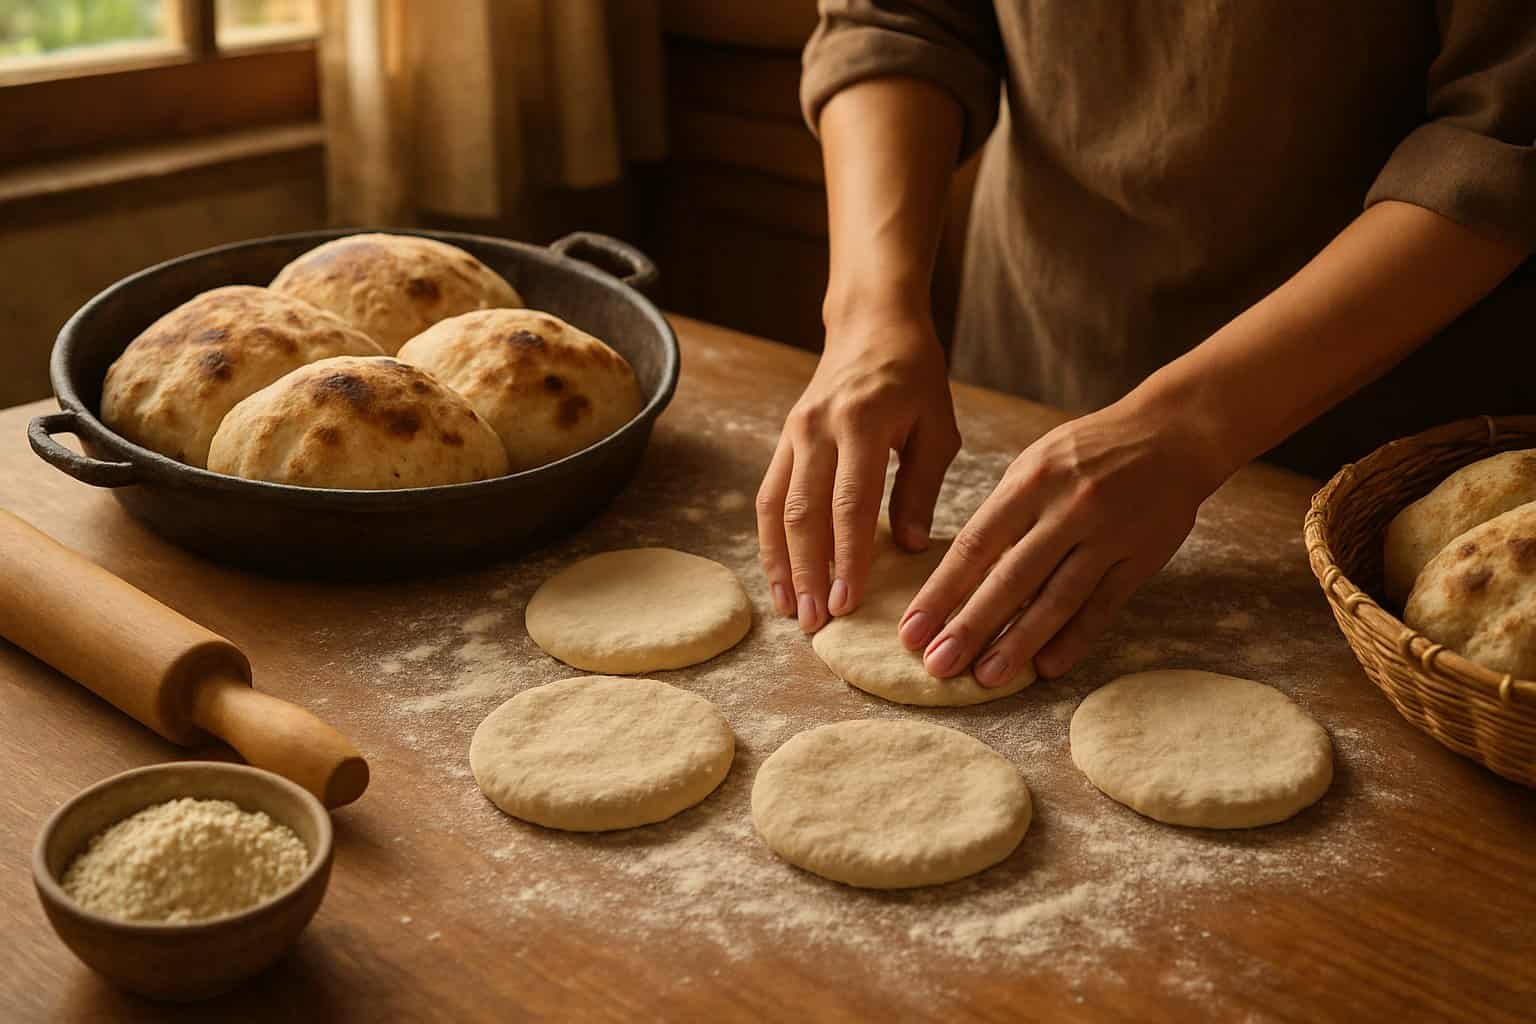
Shaping and Rolling Techniques
Use wheat flour—not white—for dusting. Sift it and use the brown flakes for that rough, traditional look.
Flatten each dough ball with a rolling pin on a floured surface. If you’re new, roll them thin at first.
Make sure the surface is well-floured so nothing sticks. Work fast but keep the thickness even.
Timing is critical when you cook. Heat a pan on high and get a hand grill going on another burner. Both need to be really hot.
Cook the dough on the hot pan for about 10 seconds per side. Then move it to the grill so it puffs.
Keep an eye on the heat—too much and it’ll burn, too little and it won’t rise.
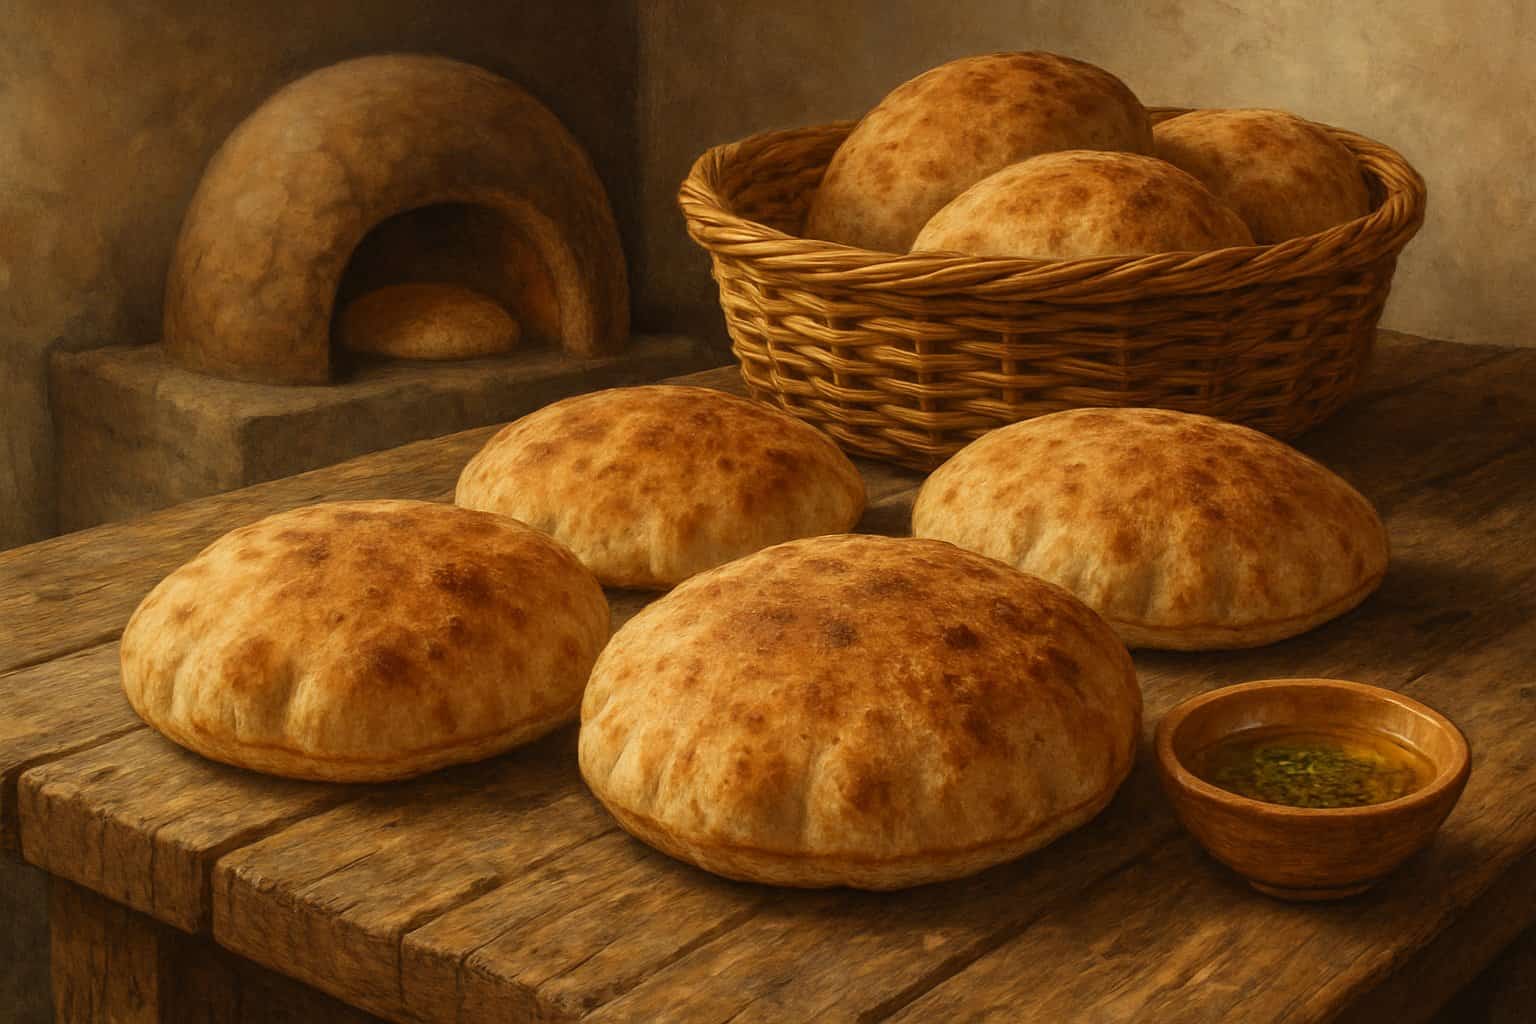
Baking Methods and Achieving the Perfect Bread Puff
The big bread puff that makes aish baladi special comes from high heat and good moisture management. Whether you use a clay oven or a modern setup, the main thing is creating steam to puff up the bread and form that classic pocket.
Traditional Clay Oven Baking
Clay ovens can hit 800°F or even higher. That’s the kind of heat you need for a proper bread puff.
These ovens, usually built from Nile River sediment, hold onto heat impressively well. Their high thermal mass gives off steady, radiant heat.
Bakers toss the shaped dough right onto the hot clay floor. The crazy-high temperature makes steam explode inside the dough almost instantly.
Traditional Clay Oven Benefits:
- Temperatures above 800°F
- Even heat distribution
- Natural steam retention
- Authentic smoky flavor
That searing heat forms a crust in seconds, trapping steam and making the bread balloon up. In Egyptian markets, pros use long wooden peels to shuffle several loaves in and out at lightning speed.
Using Modern Kitchen Equipment
Home ovens need a few tweaks to get close to what a clay oven does. A baking stone or steel, cranked up to 500°F, gives you the kind of surface heat you want for aish baladi.
Essential Equipment Setup:
- Baking stone preheated 30 minutes
- Oven temperature at 500°F
- Wooden peel dusted with flour
- Infrared thermometer for accuracy
Put the stone on the middle rack. Check the surface temp with an infrared thermometer; you want it at least 500°F before you start.
Move the shaped dough onto the stone quickly with a floured peel. Bake for about 4 minutes—don’t flip it.
That initial blast of heat creates steam, puffing the bread up in the first couple minutes.
Tips for a Signature Bread Puff
Dough hydration really matters here. You want it wet—almost pourable, but not a total puddle.
Critical Puffing Factors:
- Dough thickness: ¼ to ½ inch when shaped
- Surface temperature: Minimum 500°F
- Baking time: 4 minutes for full puff
- Moisture content: High hydration dough (78% water)
Shape the dough as evenly as you can. Thick spots just stay dense and won’t puff right.
Dust with a little flour, but don’t overdo it or you’ll block the steam.
Work fast when moving dough to the oven. If it sits too long at room temp, it won’t puff up as well.
If you’re using whole grain flours, don’t be surprised if they don’t puff perfectly. Let those loaves bake a couple minutes longer to finish cooking through.
Texture, Flavor, and Serving Suggestions
Aish Baladi’s got this chewy, nutty vibe that works for both daily meals and special spreads. It pairs up beautifully with grilled meats and all sorts of Egyptian classics.
Satisfying Texture and Taste
You get a soft, chewy inside and a thin, crisp crust—that’s what sets it apart from regular pita. The blend of whole wheat and all-purpose flours gives it a hearty, substantial feel.
The flavor? Earthy and nutty, thanks to the whole wheat flour and that bran dusting. It’s definitely more interesting than plain white bread.
Bread baked at high heat picks up a subtle smoky note. That comes through even more if you use a stone or steel.
Because it’s chewy, it’s just right for scooping up thick stews and dips. It doesn’t fall apart, even when you load it up.
Pairing with Grilled Meats and Classic Dishes
Grilled meats love this bread’s sturdy texture. Wrap up kebabs, chicken, or lamb—no problem.
Traditional combos include:
- Foul medames (stewed fava beans)
- Ta’amiya (Egyptian falafel)
- Grilled kofta and other seasoned meat dishes
- Batinjan mekhalil (pickled eggplants)
The nutty flavor stands up to rich, savory dishes without stealing the show. Its absorbency soaks up all those good sauces and juices.
A lot of Egyptian families use this bread as a base for quick meals with leftovers.
Versatile Uses in Egyptian Cuisine
This bread pulls double (or triple) duty all day long. At breakfast, it’s great for scooping up beans and eggs.
For lunch and dinner, folks use it as an edible utensil for stews and curries. The wide pockets from baking turn into handy containers for fillings.
People use it for:
- Sandwich wraps for veggies and proteins
- Dipping bread for hummus and tahini
- Side bread with soups and stews
- Base for open-faced sandwiches
Store it right and it’ll stay fresh for days. That makes it handy for meal prep, whether you’re sticking to classic Egyptian or mixing things up.
Storage, Reheating, and Lasting Freshness
Homemade aish baladi stays soft for days if you store it right. You can freeze it for weeks, and reheating brings back that fresh-baked texture and warm flavor.
Keeping Baladi Bread Fresh
Store fresh aish baladi at room temp to keep it soft. Stack the breads and wrap them in a clean kitchen towel as soon as they cool.
The towel traps leftover steam, keeping the bread pliable and stopping it from drying out.
Room temp storage works best for:
- Eating within 2-3 days
- Keeping the bread soft and flexible
- Preserving natural moisture
Slide the towel-wrapped stack into a plastic bag or airtight container. That creates a humid environment and keeps it fresh longer.
Don’t refrigerate it—cold makes it stale and tough.
Check for mold daily. Whole wheat flour and bran can attract moisture, so keep an eye out.
Freezing and Reheating Techniques
You can freeze aish baladi for up to a month if you vacuum-seal it. For best results, wrap each bread in plastic before sealing.
Freezing steps:
- Let bread cool completely
- Wrap each piece in plastic wrap
- Put in freezer bags
- Squeeze out extra air and seal
- Label and freeze right away
Thaw bread at room temp—just take it out of the bag and let it sit for 15-20 minutes.
Reheating methods:
- Oven: 300°F for 2-3 minutes, wrapped in foil
- Stovetop: Dry skillet, 30 seconds per side
- Microwave: 10-15 seconds with a damp paper towel
Honestly, the oven gives the best texture. It brings back the soft middle and keeps the outside from getting leathery.
Modern Variations and Healthy Adaptations
Bakers today like to amp up the nutrition by adding more whole grains or tweaking the recipe. You can keep the classic taste while boosting fiber, protein, and vitamins.
Incorporating More Whole Grains
A lot of bakers mix whole wheat flour with other grains for a healthier loaf. Buckwheat flour is a favorite—add about 10-20% of the total flour and you’ll get more protein and fiber.
Popular grain additions:
- Spelt flour (up to 25%)
- Barley flour (10-15%)
- Oat flour (15-20%)
- Ancient grains like emmer or einkorn
Bread with 20% buckwheat flour seems to hit the sweet spot for both taste and nutrition. The mild nutty flavor fits right in with whole wheat.
If you’re trying a new grain, start small. Too much can make the dough tricky and mess with the texture.
Tips for a Healthier Aish Baladi
You can make baladi bread more nutritious with a few easy swaps. These tweaks focus on ingredients and prep that boost health benefits without losing tradition.
Healthy modifications:
- Use 100% whole wheat flour instead of mixing with white
- Add 1-2 tablespoons of ground flaxseed or chia seeds
- Swap some water for buttermilk for extra protein
- Add a splash of olive oil for healthy fats
“Aish” means “life” in Arabic, so making it healthier feels extra meaningful. Seeds add omega-3s and minerals like magnesium.
Let the dough ferment longer—2-3 hours—for better digestibility and flavor.
Frequently Asked Questions
Aish Baladi uses whole wheat flour and bran, special puffing techniques, and has some real nutritional perks compared to regular pita.
What are the traditional ingredients used in making Aish Baladi?
Traditional Aish Baladi starts with whole wheat and all-purpose flour. The whole wheat gives you that classic earthy flavor and deep color.
Bran is a big deal in this recipe. Bakers use finely ground bran to dust the dough, which stops sticking and adds a nutty kick.
Active dry yeast gets things going, along with honey or sugar. The sweetener balances the wheat’s natural bitterness and feeds the yeast.
Add salt for flavor. Use warm water—about 100-110°F—to wake up the yeast without killing it.
How do I make my own Aish Baladi at home?
Start by making a biga (starter). Mix yeast with warm water, let it foam for 15 minutes, then add bread flour and cold water.
Ferment the starter in the fridge for 24 hours. That slow rise builds flavor and makes the dough easier to handle.
Mix the starter (at room temp) with whole wheat flour, salt, and honey dissolved in warm water. Knead hard for 10-15 minutes until it turns elastic and a bit sticky.
Let the dough rise overnight in the fridge. Divide into 16 balls, roll each into a 5-inch circle about 1/4 inch thick.
Dust with a mix of bran and flour. Let them rest for 20 minutes, then bake on a hot stone at 500°F for 2-4 minutes.
What are the main differences between traditional Egyptian Baladi bread and pita bread?
Baladi bread’s got a heartier, earthier texture than pita. The whole wheat makes it rustic and nutty.
Bran on the surface gives baladi its speckled look and adds nutrition—pita doesn’t usually have that.
Baladi’s a bit thicker and denser than most pita. The prep methods are different too—baladi uses longer fermentation and special rolling to get that signature pocket.
What are the nutritional benefits of consuming Egyptian Baladi bread?
Whole wheat flour packs in fiber, which helps digestion and keeps blood sugar steady.
Bran adds nutrients and minerals, boosting the bread’s overall value compared to white flour breads.
Baladi bread has more protein than regular white bread, thanks to all those whole grains.
The fermentation breaks down some tough proteins, making it easier to digest and good for gut health.
Can you provide a simple Baladi bread recipe suitable for beginners?
Mix 3/4 teaspoon active dry yeast with 1/2 cup warm water. Let it foam for 15 minutes.
Add 3 1/2 cups bread flour and 1 1/4 cups cold water. Mix until sticky, cover, and chill for 24 hours.
Combine the starter with 1 1/2 cups whole wheat flour, 1 tablespoon salt, and 3 tablespoons honey dissolved in warm water. Knead for 10-15 minutes until elastic.
Let rise overnight in the fridge. Divide into 16 pieces, roll into circles about 1/4 inch thick.
Dust with bran if you have it, rest for 20 minutes, then bake on a preheated stone at 500°F for 2-4 minutes until puffed.
What techniques are involved in crafting authentic Egyptian flatbread?
You really have to knead the dough well—at least 10 minutes of vigorous mixing. That’s what gets the gluten working and gives the bread its signature pocket.
When you roll out the dough, keep it even. Aim for circles about a quarter-inch thick, and try not to poke holes.
Crank up the heat—like, really high. A baking stone or even an upside-down sheet pan at 500°F does the trick for that intense bottom heat.
As soon as the bread comes out, stack it up and toss a clean towel over the pile. The steam keeps everything soft and flexible, just the way it should be.